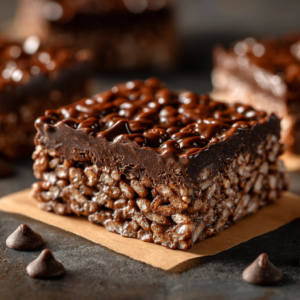
There’s something irresistibly comforting about the crunchy texture of a homemade bar paired with a smooth, rich chocolate topping. These Homemade Chocolate Crunch Bars bring back nostalgic memories of childhood treats but with a grown-up flair, combining the perfect balance of crispiness and chocolate decadence. Whether you need a sweet pick-me-up or a simple dessert to share with friends and family, these bars deliver every time.
The recipe is straightforward and versatile, making it suitable for both beginner and seasoned bakers. From the buttery, crunchy base made of crispy cereal and graham cracker crumbs to the luscious chocolate layer enhanced with a hint of peanut butter, these bars are pure delight in every bite.
- Combines two delightful textures: a crisp, buttery base with a smooth, creamy chocolate topping.
- Versatile and customizable with different cereal choices and chocolate varieties.
- Perfect for dessert, snacking, or sharing at gatherings with minimal prep time.
Ingredients
- Crispy Cereal (3 cups): Use Rice Krispies or cornflakes for a light, crunchy base texture that holds well when baked.
- Graham Cracker Crumbs (1½–2 cups): Adds a slightly sweet, honeyed flavor and crumbly texture that binds the cereal together.
- Unsalted Butter, Melted (1 cup / ≈ 225 g): Provides richness and helps bind the dry ingredients for a sturdy, golden crust.
- Brown Sugar (1 cup): Adds moisture and deep caramel notes, balancing the crunch with sweetness.
- Salt (½ tsp): Enhances all flavors and balances sweetness, lifting the overall taste of the base.
- Chocolate Chips (2 cups): Use milk, dark, or semi-sweet chocolate depending on your preference for sweetness and flavor depth.
- Peanut Butter (2–3 tbsp, Optional): Adds creaminess and a subtle nutty richness to the chocolate topping, enhancing texture.
Instructions
- Prep and Preheat Your Oven
-
Begin by preheating your oven to 175 °C (approximately 350 °F). Prepare a 9×13-inch baking pan by lining it with parchment paper or lightly greasing it. This step is crucial as it ensures your bars can be easily lifted out after baking without sticking.
- Create the Crunchy Base Mixture
-
In a large mixing bowl, combine the crispy cereal, graham cracker crumbs, melted butter, brown sugar, and salt. Stir thoroughly to ensure every piece is evenly coated with the buttery-sugar mixture. This evenly coated mix will help form a cohesive, crunchy texture after baking.
- Press and Bake the Base
-
Firmly press the cereal mixture into the bottom of the prepared pan, ensuring you spread it evenly for uniform thickness throughout. Bake in the preheated oven for 10–12 minutes until the base is set and starts to turn a light golden brown. This baking step caramelizes the sugar and butter, resulting in rich, sturdy bars.
- Add and Soften the Chocolate Layer
-
Remove the pan from the oven and immediately sprinkle the chocolate chips evenly over the hot base. If using peanut butter, add small dollops over the chocolate chips. Allow the chocolate to soften from the residual heat for a few minutes; this gentle melting makes it easier to spread smoothly.
- Spread the Chocolate Topping Smoothly
-
Using a spatula, spread the softened chocolate and peanut butter mixture evenly across the baked base. This creates a luscious, silky layer that complements the crunchy foundation perfectly. Even spreading also helps the chocolate set uniformly once chilled.
- Refrigerate to Set
-
Place the pan in the refrigerator and chill for at least 1–2 hours to allow the chocolate topping to fully firm up. This step is essential for clean slicing and ensures each bar keeps its shape while providing a satisfying texture contrast.
- Slice and Serve
-
Once completely set, use the parchment edges to lift the bars out of the pan. Cut into squares or rectangles according to your preference. Serve these bars as a delightful treat with coffee or cold milk, or package them for easy grab-and-go snacking.
- For best crunch, avoid soggy cereals by baking the base until lightly golden and fully set before adding chocolate.
- Mix chocolate chip varieties for richer flavor complexity; milk and dark chocolate blends work wonderfully.
- If you omit peanut butter, the chocolate may harden slightly more; consider adding a small splash of cream for smoothness.
Storage Tips
Store these Chocolate Crunch Bars in an airtight container in the refrigerator where they keep fresh for up to one week. For longer storage, you can freeze the bars wrapped tightly for up to a month, thawing them before serving.
Serving Suggestions
These bars pair beautifully with a tall glass of cold milk or a robust cup of coffee to balance the sweetness. They’re also a hit at potlucks and perfect for a quick sweet snack during busy days.
- Press the base mixture firmly and evenly to prevent crumbly edges once baked.
- Let chocolate chips soften before spreading to avoid a patchy or broken top layer.
- Use parchment paper for easy bar removal and clean slicing without sticking.
FAQs
- Can I use other cereals besides Rice Krispies?
-
Absolutely! Cornflakes or bran flakes work well for different textures, providing either extra crispiness or a heartier bite.
- Is the peanut butter necessary in the chocolate topping?
-
No, it’s optional. Peanut butter adds creaminess and flavor but the bars are delicious even without it.
- How can I prevent the bars from getting soggy?
-
Make sure to bake the base until light golden and fully set, and refrigerate the bars completely before slicing to maintain crunchiness.
- Can I use white chocolate instead of regular chocolate chips?
-
Yes, but white chocolate melts differently and may require careful monitoring to avoid burning or uneven setting.
- Can these bars be made vegan?
-
To make a vegan version, substitute butter with plant-based margarine and use dairy-free chocolate chips.
- How should I cut the bars to get even pieces?
-
Use a sharp knife and wipe it clean between cuts for smooth, clean edges.
- Are these bars freezer-friendly?
-
Yes, wrap them well and freeze for up to a month. Thaw in the refrigerator before serving.
Chocolate Crunch Bars
Equipment
- 1 9x13-inch baking pan lined with parchment paper or greased
- 1 large mixing bowl
- 1 spatula for spreading chocolate
Ingredients
- 3 cups crispy cereal Rice Krispies or cornflakes
- 1½ –2 cups graham cracker crumbs
- 1 cup 8 oz unsalted butter, melted
- 1 cup brown sugar
- ½ teaspoon salt
- 2 cups chocolate chips milk, dark, or semi-sweet
- 2 –3 tablespoons peanut butter optional
Instructions
- Preheat oven to 350 °F. Line a 9x13-inch baking pan with parchment paper or grease it lightly.
- In a large bowl, combine crispy cereal, graham cracker crumbs, melted butter, brown sugar, and salt. Mix until evenly coated.
- Press the mixture firmly and evenly into the bottom of the prepared pan.
- Bake for 10 to 12 minutes until the base is set and lightly golden.
- Remove from oven and immediately sprinkle chocolate chips evenly over the warm base.
- Add small dollops of peanut butter on top of the chocolate chips if using.
- Allow the chocolate to soften for a few minutes, then spread into a smooth layer.
- Refrigerate for 1 to 2 hours until the chocolate topping is firm.
- Use parchment edges to lift out bars and cut into squares or rectangles to serve.
Notes
- Use crispy rice or cornflakes for extra crunch; bran flakes add a heartier texture.
- Combine milk and dark chocolate chips for balanced sweetness.
- Peanut butter enhances richness and smooths the chocolate layer.
- Serve with cold milk or coffee for best enjoyment.
- Store bars in an airtight container in the fridge for up to one week.